
Want to know how to tile a room? Check out this Den, Laundry Room, and Powder Room Makeover!
- ginaspino
- Jan 29, 2022
- 3 min read
When my fiance and I purchased our 1725 Farmhouse back in May of 2021, you would think the old part needed more work than the 1989 addition. Well, I love the character of the 1700s but not so much the lack of charm in the newer part. The Den is off of the kitchen and also has doors to the laundry room and a powder room.
Before Pictures


I love tackling projects myself in order to save some money and make sure it is done to my standards. It also helps that my father has years of construction work under his belt and my fiance is a plumber. I am the creative one that dreams up the projects and I am grateful they are willing to make it happen! So one of the first projects was to make these rooms over! I decided on replacing the dated and beat-up vinyl floor with a rustic brick ceramic tile. I am so happy with how the tile tied these rooms in with the rest of the old character of the home.
So if you would like some tips on how to tile a room, continue below or just scroll down for the after shots!
Tiling Steps
Step 1 - Prep Work
Before you can lay down tile you have to do some key prep work. I had to make sure any loose vinyl flooring was scraped up and removed all the baseboards around the room.
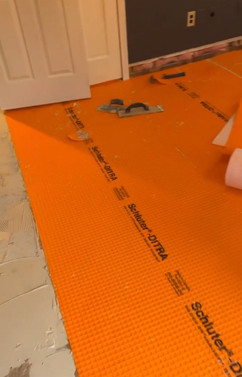
Then, instead of using a cement board, which is typically used as the underlayment for a tile job, I used the Shluter System's polyethylene waterproof membrane. Personally, I found it to be thin, lightweight, and easier to use than cement board. You simply roll it out, cut it to the length of the room and adhere it to the floor with tile mortar.


Step 2- Tiling
After all the membrane was laid down, we mixed up some more mortar and began tiling in a standard brick pattern. We used 1/8" spacers for the grout joint. It is important to work in a pyramid stacking method, never going past the last tile in the row you previously completed to avoid issues later when laying your tile.


Step 3-Grouting
The next step is to fill the joints between the tile with grout. I chose a greige color because I wanted something that would hide dirt but not be too contrasting next to the colors in the tile. When grouting it is important to make sure you are packing the grout deep into the joint to avoid pinholes or empty spaces. Then, wipe away the excess grout with a damp sponge once it dries to a haze. Rinse and repeat! About an hour later, you will want to take a dry towel and wipe up any more grout residue and then you're done!


Complete The Look!
Tiling the floor was just one of the many things that went into this makeover! I also, painted, swapped out the old ceiling fan for a new one, installed a utility sink in the laundry room, wallpapered an accent wall in the bathroom, and added new fixtures. I am so happy with how it turned out, and hope you like it too! Feel free to reach out to me if you have any questions or would like to know more about this makeover!
Thanks for reading,
Gina
After Pictures


Material list
Avalon Tile-Chicago Brick Ceramic Tile
Schluter Underlayment
Schluter Quick Set Mortar
Avalon Grout-Color Sand
Comments